🚀
Quick Setup
Get up and running with pdgen in minutes with our easy installation process.
Python to UML Class Diagram Generator
Effortlessly visualize your Python code as UML classes.
Discover how pdgen can transform your Python code into comprehensive UML class diagrams with ease. Our tool is designed to help developers understand complex code bases through visual representation.
Install pdgen via pip:
pip install pdgenHere’s how you can use PDGen to generate a UML diagram:
from pdgen import include_in_uml, generate_diagram

@include_in_uml
class Bike:
    def __init__(self, name: str):
        self.name = name


@include_in_uml
class Car:
    _name: str
    _length: float

    def get_name(self) -> str:
        return self._name

    @include_in_uml
    def drive(self):
        pass

    @include_in_uml
    def _turn_off_lights(self) -> None:
        pass

generate_diagram(Path("diagram_new.png"), Path("diagram_new.txt"))diagram_new.png: An UML diagram image PNGdiagram_new.txt: The PlantUML source text for the diagram.The generated UML diagram includes the annotated classes and methods:
@startuml
skinparam dpi 600

class Car {
    - _name : str
    - _length : float
    - _turn_off_lights()
    + drive()
}
class Bike {
    + name : str
}

@enduml
Created by Softoft
Installing pdgen is straightforward. This page will guide you through the process of getting pdgen set up on your system so you can start generating UML class diagrams from your Python code.
Before you install pdgen, ensure you meet the following requirements:
You can install pdgen using pip, Python's package manager. Open your terminal and run the following command:
pip install pdgenThis command will download and install the latest version of pdgen and all required dependencies.
If you encounter any issues during the installation, here are a few common problems and solutions:
Permission Errors: If you receive a permission error, try installing pdgen with administrative privileges or use a virtual environment.
sudo pip install pdgenDependency Conflicts: If there are conflicts with existing packages, consider installing pdgen in a virtual environment using venv or conda.
python -m venv pdgen-env
source pdgen-env/bin/activate
pip install pdgenHere’s how you can use PDGen to generate a UML diagram:
import logging
from pathlib import Path

# Configure logging to see debug output
logging.basicConfig(level=logging.DEBUG)

from pdgen import include_in_uml, generate_diagram
from dataclasses import dataclass

@include_in_uml
class Bike:
    def __init__(self, name: str):
        self.name = name


@include_in_uml
@dataclass
class Car:
    _name: str
    _length: float

    def set_name(self, name: str) -> None:
        self._name = name

    def get_name(self) -> str:
        return self._name

    @include_in_uml
    def drive(self):
        pass

    @include_in_uml
    def get_fuel_level(self) -> float:
        pass

    @include_in_uml
    def _turn_off_lights(self) -> None:
        pass

if __name__ == '__main__':
    # Generate a UML diagram
generate_diagram(Path("diagram_new.png"), Path("diagram_new.txt"))The above script generates:
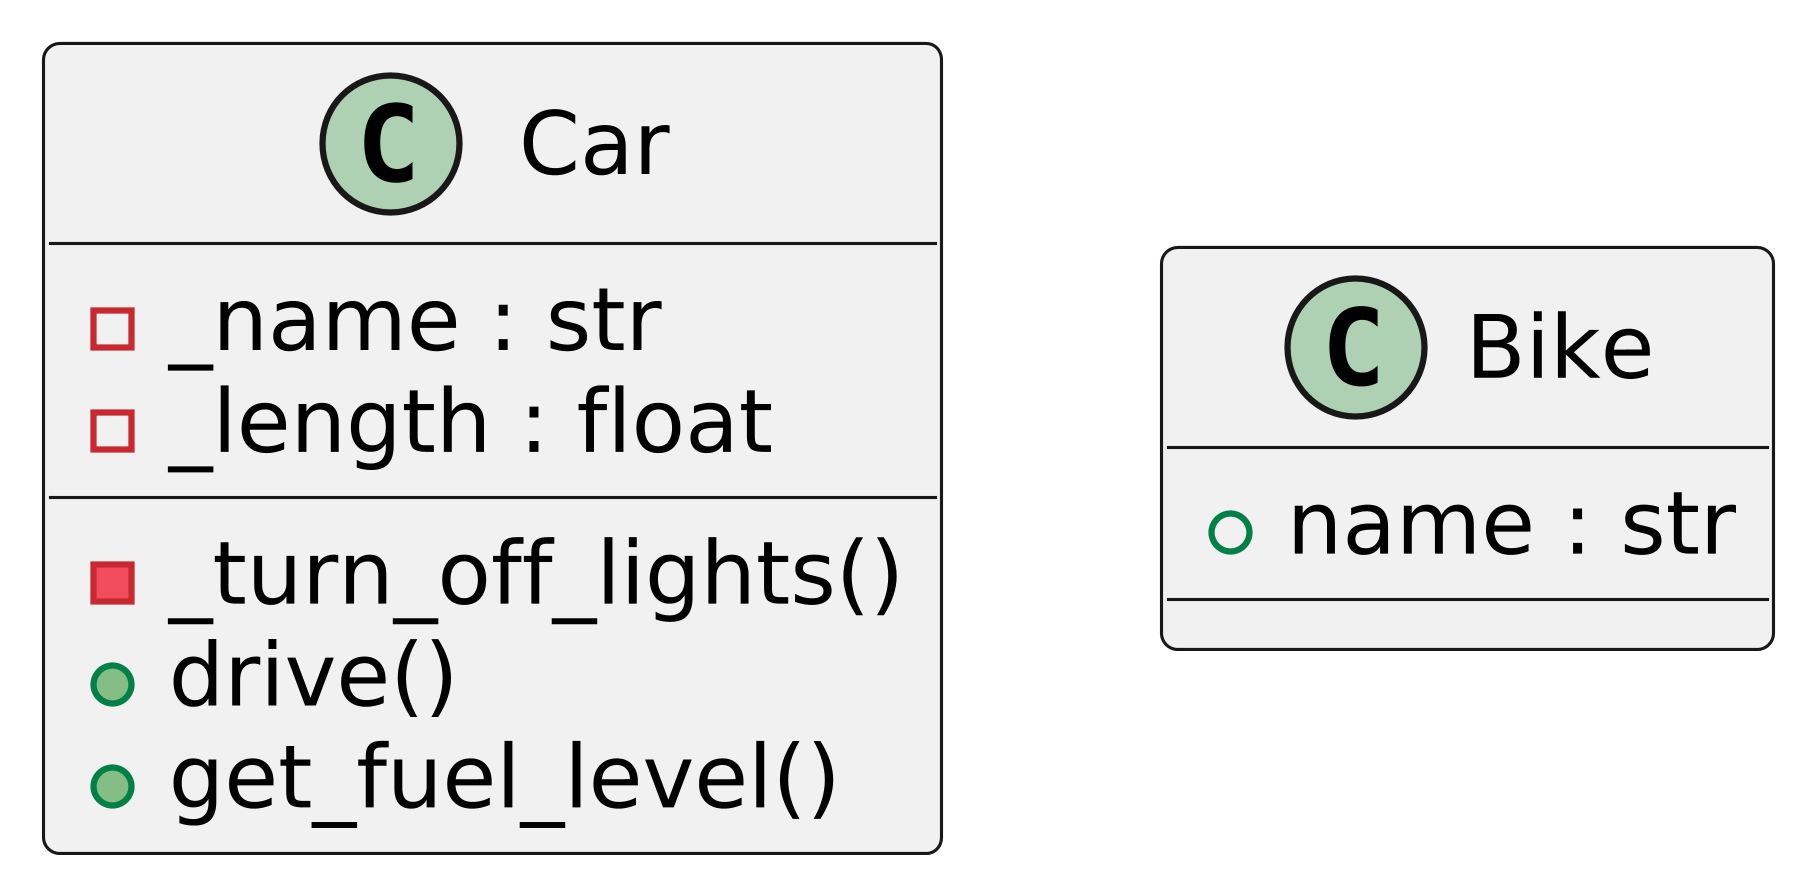
diagram_new.png: A UML diagram image.diagram_new.txt: The PlantUML source text for the diagram.The generated UML diagram includes the annotated classes and methods:
@startuml
skinparam dpi 600

class Car {
    - _name : str
    - _length : float
    - _turn_off_lights()
    + drive()
    + get_fuel_level()
}


class Bike {
    + name : str
}

@enduml@include_in_uml A decorator used to mark classes or methods for inclusion in the UML diagram.
generate_diagram(output_path: Path, uml_text_path: Path) Generates a UML diagram and optionally saves the PlantUML source.
output_path: Path to save the generated UML diagram (e.g., PNG format).uml_text_path: Path to save the PlantUML source text.PDGen uses Python's logging module to output debug information. You can configure the logging level in your script for better insights into the generation process.
import logging
logging.basicConfig(level=logging.DEBUG)WARNING
This is a work in progress. These are just ideas for future versions!
pdgen is designed to be flexible and customizable to fit various development environments and preferences. This page explains how to configure pdgen to optimize its functionality for your projects.
Upon installation, pdgen works out of the box with default settings that are suitable for most projects. However, you can customize these settings to better fit your specific needs.
You can specify the directory where the generated UML diagrams should be saved:
pdgen --output-directory /path/to/your/directorypdgen allows you to customize the appearance of the generated diagrams. You can specify colors, fonts, and line styles:
pdgen --color-scheme dark --font Arial --line-style dottedWARNING
This is a work in progress. These are just ideas for future versions!
For users who need more control over the generation process, pdgen offers several advanced configuration options.
By default, pdgen does not include private methods in the diagrams. To include them, use the following flag:
pdgen --include-privateIf you want to generate diagrams for specific classes, you can use the filter option to specify which classes to include:
pdgen --filter "Class1,Class2"Instead of passing options through the command line every time, you can create a configuration file named pdgen.config.json and store your preferences there:
{
  "outputDirectory": "/path/to/your/directory",
  "colorScheme": "dark",
  "font": "Arial",
  "lineStyle": "dotted",
  "includePrivate": true,
  "filter": [
    "Class1",
    "Class2"
  ]
}
Use the configuration file by specifying it when running pdgen:
pdgen --config pdgen.config.jsonWARNING
This is a work in progress. These are just ideas for future versions!
pdgen offers a range of advanced features that enable users to handle complex scenarios and enhance the utility of the generated UML diagrams. This section explores these capabilities and provides guidance on how to leverage them to their fullest potential.
pdgen supports custom themes for diagrams, allowing users to tailor the visual style to match their organization's branding or personal preference. You can define your theme settings in the configuration file:
{
  "theme": {
    "backgroundColor": "#ffffff",
    "lineColor": "#000000",
    "textColor": "#333333",
    "highlightColor": "#ff0000"
  }
}To better manage the layout of complex diagrams, pdgen offers several layout algorithms:
pdgen --layout horizontalWARNING
This is a work in progress. These are just ideas for future versions!
pdgen can be integrated into popular Integrated Development Environments (IDEs) like Visual Studio Code or PyCharm. This integration allows you to generate UML diagrams directly from the IDE, enhancing your workflow. For example, to set up pdgen with Visual Studio Code, add the following extension settings:
{
  "pdgen.enable": true,
  "pdgen.autoUpdate": true
}pdgen can be used as part of automation scripts or CI/CD pipelines. You can script diagram generation for automated documentation updates:
pdgen --auto-generate --watch /path/to/python/codeFor projects that require dynamic updates to diagrams as code changes, pdgen supports live updating features, which automatically regenerate diagrams when the source code changes.
pdgen --live-updatepdgen supports collaborative features, allowing teams to work together on the same diagrams. This includes sharing settings and collaborative editing through a shared server setup.
pdgen --collaborate --server-url "http://yourserver.com"